Showing Posts From
Pc building
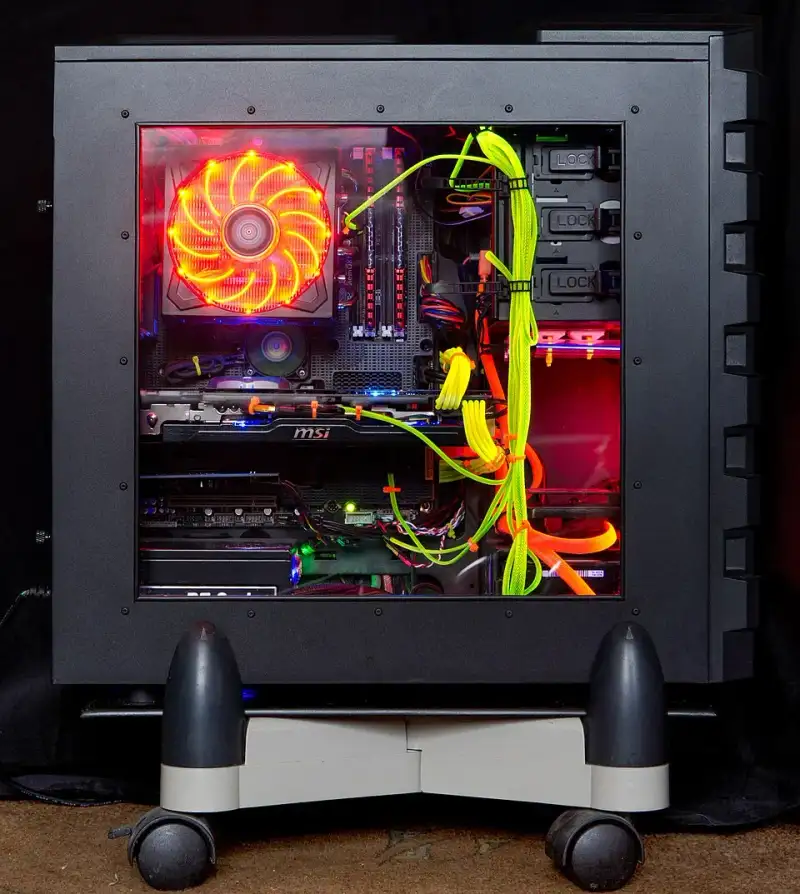
-
 John Doe
 - 14 Jun, 2026 10:00
The Ultimate Guide to Custom PC Building: Forging Your Digital Masterpiece
In an age where technology is seamlessly integrated into every facet of our daily lives, there is a profound, almost magical satisfaction in understanding the inner workings of the machines we rely on. For many, a computer is merely a black box—a mysterious monolith that magically renders video games, crunches massive datasets, and connects us to the global village. But for the initiated, a personal computer is not something you simply buy; it is something you craft. Welcome to the world of custom PC building, a realm where technology meets personal expression, and where a pile of cardboard boxes transforms into a digital powerhouse tailored exactly to your needs. #CustomPC #PCMasterRace #TechEnthusiast Building your own computer from scratch is an empowering experience. It demystifies the technology, removing the veil of corporate branding and proprietary constraints. When you build your own rig, you dictate the rules. You choose the exact balance of performance, aesthetics, and acoustics. You are no longer tethered to the questionable configuration choices or pre-installed bloatware of major manufacturers. More importantly, building a PC is fundamentally a rite of passage for any true technology enthusiast. It teaches patience, meticulousness, and problem-solving. In this extensive guide, we will journey together through the entire process of custom PC building—from the initial conceptualization and component selection to the intricate dance of assembly and the final, triumphant press of the power button. #DIYComputer #BuildYourOwnPC The Anatomy of a Personal Computer Before you can assemble your dream machine, you must first understand the purpose of each component. Think of a computer as a digital organism. Each part plays a specific, critical role in keeping the system alive and functioning efficiently. The Central Processing Unit (CPU) The CPU is the undisputed brain of your computer. It is responsible for executing instructions, performing calculations, and coordinating the activities of all other components. Whether you are browsing the web, compiling code, or calculating complex physics in a modern video game, the CPU is the maestro directing the orchestra. When selecting a CPU, you will look at metrics like core count, thread count, and clock speed. Modern processors from giants like Intel and AMD offer an incredible range of options, from budget-friendly quad-core chips to monstrous multi-core behemoths designed for heavy productivity workloads. Choosing the right CPU sets the foundation for your entire build. #CPU #Processor #Intel #AMD The Motherboard If the CPU is the brain, the motherboard is the nervous system. It is the central printed circuit board that connects all your components together, allowing them to communicate and share power. Motherboards come in various form factors—such as ATX, Micro-ATX, and Mini-ITX—which dictate the size of the computer case you will need. Beyond size, motherboards offer a myriad of features including built-in Wi-Fi, premium audio codecs, massive power delivery systems for overclocking, and multiple slots for expanding your storage. The motherboard also dictates which generation of CPU and RAM you can use, making it a critical choice that determines your system's upgrade path. #Motherboard #PCComponents #TechHardware Random Access Memory (RAM) RAM acts as your computer's short-term memory. Whenever you open an application, load a game level, or edit a photograph, the CPU pulls the necessary data from your long-term storage and places it into the RAM for lightning-fast access. Without enough RAM, your system will constantly swap data back and forth from your slower storage drive, resulting in stuttering and lag. In today's computing landscape, 16GB of DDR4 or DDR5 RAM is considered the standard sweet spot for most users, while power users and heavy gamers often opt for 32GB or even 64GB to ensure seamless multitasking and performance. #RAM #PCMemory #DDR5 The Graphics Processing Unit (GPU) For gamers, 3D artists, and video editors, the GPU is the most important and often the most expensive component in the build. While the CPU handles general calculations, the GPU is a specialized processor designed exclusively to render graphics and accelerate specific workloads. A powerful graphics card translates raw data into the beautiful, high-resolution, high-framerate visuals you see on your monitor. Features like real-time ray tracing and AI-driven upscaling (such as NVIDIA's DLSS or AMD's FSR) have made modern GPUs incredibly complex and capable. #GPU #GraphicsCard #NVIDIA #Radeon #GamingSetup Storage Solutions (SSD vs. HDD) Storage is the long-term memory of your computer, where your operating system, applications, and files reside permanently. Historically, Hard Disk Drives (HDDs) with spinning magnetic platters were the norm. Today, Solid State Drives (SSDs) have completely revolutionized the landscape. Specifically, NVMe M.2 SSDs, which plug directly into the motherboard and use the PCIe interface, offer read and write speeds that are exponentially faster than traditional SATA drives. A fast SSD means your computer boots up in seconds, games load almost instantly, and the entire operating system feels incredibly snappy and responsive. #SSD #NVMe #PCStorage The Power Supply Unit (PSU) Often overlooked but absolutely vital, the PSU is the heart of your computer. It takes the alternating current (AC) from your wall outlet and converts it into the stable direct current (DC) required by your components. A cheap, unreliable power supply can literally destroy your entire system if it fails. When choosing a PSU, you must consider the total wattage required by your parts (with a healthy overhead margin), the efficiency rating (such as 80 Plus Gold or Platinum), and whether you want a modular design, which allows you to plug in only the cables you need, drastically improving the cable management process. #PowerSupply #PSU #TechSafety Cooling Systems Computer components, especially the CPU and GPU, generate a tremendous amount of heat. If this heat is not dissipated effectively, the parts will automatically slow themselves down (thermal throttling) to prevent damage, or worse, shut down completely. CPU coolers come in two main varieties: air coolers and liquid coolers (AIOs). Air coolers use a block of metal fins and a fan to blow the heat away, offering excellent reliability. Liquid coolers use a pump, tubes, and a radiator to transfer heat away from the CPU, often providing better cooling capacity and a cleaner aesthetic. In addition to the CPU cooler, your case will need intake and exhaust fans to maintain a steady flow of fresh, cool air throughout the chassis. #PCCooling #WaterCooling #AirCooling The Chassis (Case) The case is the skeleton and the skin of your computer. It holds all the components in place, dictates the airflow paths, and defines the visual identity of your build. Cases come in all shapes and sizes, from massive full-tower monoliths with tempered glass side panels to ultra-compact Small Form Factor (SFF) enclosures that can fit in a backpack. A good case will offer excellent airflow, intuitive cable management channels, and plenty of space for your specific components. #PCCase #PCMods #SetupInspiration Planning, Budgeting, and the Art of Balance The journey of custom PC building begins long before you touch a screwdriver. It starts with planning. The most common mistake new builders make is mismatched components—creating a system where one part significantly holds back the performance of the others, a phenomenon known as a bottleneck. For instance, pairing a top-of-the-line $1,500 graphics card with a budget $100 processor will result in the GPU waiting idly for the CPU to send it instructions. Conversely, a high-end CPU paired with a weak GPU will result in poor gaming performance, as the graphics card struggles to render frames fast enough. Achieving a balanced build requires research and a clear understanding of your use case. Are you building an esports machine focused on 1080p high-refresh-rate gaming? Are you a video editor who needs massive multi-core performance and terabytes of fast storage? Or are you aiming for a 4K living room gaming console replacement? Budgeting is equally critical. It is easy to get caught up in the marketing hype and overspend on features you don't need. Establishing a hard budget and allocating funds proportionally is a skill. Generally, for a gaming PC, the GPU should consume about 40% to 50% of your total budget. Tools like PCPartPicker are invaluable during this phase; they allow you to compile a virtual list of components, automatically flag compatibility issues, and track price changes across various retailers. #PCPartPicker #TechBudget #PCSetup The Preparation and Workspace Once the components arrive, it is tempting to rip open the boxes and start shoving parts together. However, preparation is key to a smooth and stress-free build process. First, prepare your workspace. You need a large, clean, well-lit table. Avoid building on carpet, as the static electricity generated by your socks rubbing on the floor can theoretically discharge into sensitive electronic components and damage them. While modern PC parts are surprisingly resilient to Electrostatic Discharge (ESD), it is always best practice to ground yourself occasionally by touching a large metal object or by wearing an anti-static wristband. Gather your tools. You only really need one tool: a high-quality, medium-sized Phillips-head screwdriver (ideally magnetized, to prevent tiny screws from falling into the dark crevices of your case). Having some zip-ties or Velcro straps on hand for cable management, a pair of flush cutters, and a small flashlight will also make your life significantly easier. #PCWorkspace #TechPrep #DIYSetup The Assembly Process: A Step-by-Step Journey Building a PC is essentially assembling expensive, high-tech Lego blocks. The connectors are standardized, and generally, things only fit where they are supposed to go. Phase 1: The Out-of-Case Build The smartest way to start is by assembling the core components on the motherboard before placing it inside the case. The motherboard box serves as an excellent, non-conductive test bench. First, install the CPU. Unlatch the socket on the motherboard, gently align the golden triangle on the corner of the CPU with the corresponding triangle on the socket, and drop it in. It should require zero force. Lock the retention arm in place. Next, install the RAM. Push down the clips at the ends of the RAM slots, line up the notch on the memory stick with the ridge in the slot, and press down firmly until the clips snap back into place with a satisfying click. Finally, install your M.2 NVMe SSD. Slide the drive into the tiny M.2 slot at a 30-degree angle, push it flat, and secure it with the minuscule screw provided with your motherboard. With these three components installed, you have completed the most delicate part of the build. #PCAssembly #TechDIY Phase 2: The Motherboard Migration Now, prepare the case. Lay it flat on its side. Ensure that the motherboard standoffs (the little metal pegs that keep the back of the motherboard from touching the metal case and shorting out) are installed in the correct positions for your motherboard size. If your motherboard does not have a pre-installed I/O shield, snap the metal I/O shield into the rectangular cutout at the rear of the case. (Be warned: the edges can be surprisingly sharp!). Carefully lower the motherboard into the case, aligning the rear ports with the holes in the I/O shield and the screw holes with the standoffs. Secure the motherboard with screws, working in a star pattern to ensure even pressure. #MotherboardInstallation Phase 3: Wiring and Power Install the Power Supply Unit into its designated shroud, usually at the bottom of the case. Now begins the meticulous task of cable management. Route the massive 24-pin ATX power cable from the back of the motherboard tray and plug it firmly into the right side of the motherboard. Route the 8-pin EPS CPU power cable to the top-left corner. Next, tackle the front panel connectors. These tiny, individual wires connect the case's power button, reset switch, and indicator LEDs to the motherboard. They are notoriously frustrating to plug in due to their size, so consult your motherboard manual closely. Plug in the front panel USB and HD Audio cables as well. #CableManagement #PCWiring Phase 4: The GPU and Final Touches The final major component is the graphics card. Remove the PCIe slot covers on the back of the case. Push down the locking clip on the top PCIe x16 slot on the motherboard. Carefully align the GPU and press it firmly into the slot until the clip snaps closed. Secure the heavy card to the case chassis using screws to prevent sagging. Finally, run the necessary PCIe power cables from the PSU to the GPU. Double-check every connection. Ensure all fans are plugged into the appropriate fan headers on the motherboard. Take a moment to tidy up the cables in the back using zip ties. A clean build not only looks better but also promotes better airflow. #GraphicsCardInstall #CleanSetup The First Boot and BIOS Configuration The physical assembly is complete, but the psychological climax of the build is the First Boot. Plug in the power cable, flip the switch on the back of the PSU, connect your monitor, keyboard, and mouse, and press the power button on the front of the case. If all goes well, the fans will spin up, the RGB lights (if you have them) will illuminate, and a few seconds later, your monitor will display the motherboard manufacturer's logo and ask you to press a key to enter the BIOS (Basic Input/Output System). This is the moment of immense relief and pride. If nothing happens, do not panic. 90% of the time, a failed boot is due to a loose cable, RAM not seated completely, or the power switch simply not being turned on. Once in the BIOS, your first task is to verify that all your components are recognized. Check the CPU temperature to ensure the cooler is mounted properly. Next, enable XMP (Extreme Memory Profile) or EXPO for your RAM; without this, your memory will run at a sluggish base speed rather than the fast speed you paid for. Adjust your fan curves if you want a quieter system, and set your boot priority to the USB flash drive containing your operating system installation media. #BIOS #FirstBoot #TechSuccess Operating System and Software Optimization With the hardware finalized, it is time to give your computer a soul. Insert your Windows or Linux installation USB, save your BIOS settings, and restart. The installation process is straightforward, guiding you through partitioning your drive and setting up user accounts. Once you arrive at the desktop, your job is not quite done. Your computer will look a bit strange initially because it is using generic display drivers. The first order of business is to download and install the latest drivers for your motherboard chipset and, most importantly, your GPU. These drivers are the specialized software that allows your operating system to utilize the hardware fully. Run Windows Update repeatedly until there are no more updates left. Download hardware monitoring software like HWMonitor to keep an eye on your system temperatures under load. Finally, download the software necessary to control any RGB lighting in your system, allowing you to synchronize the colors and effects to match your personal aesthetic. #Windows11 #LinuxGaming #PCSetup Conclusion Custom PC building is a magnificent convergence of engineering, logic, and art. It transforms the act of computing from a passive consumer experience into an active, creative endeavor. The machine humming quietly on your desk is no longer just a tool; it is a manifestation of your research, your budget, and the careful labor of your own hands. The beauty of a custom PC is that the journey never truly ends. In a few years, when new games demand more graphical horsepower, you don't need to throw the whole computer away. You simply unclip the old GPU, slot in a new one, and your masterpiece is reborn, ready to tackle the future. Whether you are building an ultra-budget workstation for studying or a liquid-cooled powerhouse that rivals supercomputers of the past, the knowledge and satisfaction gained from building your own custom PC is an invaluable reward. Happy building! #TechEnthusiast #CustomPCBuild #MasterRace #HardwareJourney #PCBuilding #CustomPC #Hardware #GamingSetup Related InsightsRevolutionizing Archival Systems: The Future of DNA Data Storage The Art of Tech Reviewing: A Comprehensive Guide to Mastering the Craft The Algorithmic Canvas: How AI-Generated Art is Redefining Creativity, Ownership, and the Future of Digital Expression{ "@context": "https://schema.org", "@type": "FAQPage", "mainEntity": [ { "@type": "Question", "name": "What is the main focus of The Ultimate Guide to Custom PC Building: Forging Your Digital Masterpiece?", "acceptedAnswer": { "@type": "Answer", "text": "A comprehensive and engaging guide to building your own custom PC from scratch, covering components, assembly, and optimization." } }, { "@type": "Question", "name": "Who authored the comprehensive guide on The Ultimate Guide to Custom PC Building: Forging Your Digital Masterpiece?", "acceptedAnswer": { "@type": "Answer", "text": "This detailed article and its insights were carefully researched and authored by John Doe." } }, { "@type": "Question", "name": "Where can I find more related content about Technology?", "acceptedAnswer": { "@type": "Answer", "text": "You can explore more articles, detailed reviews, and similar insights by browsing the Related Insights section at the bottom of this article or visiting our dedicated Technology category page." } } ] }